Endurance drivers with a fixed rig
You practise consistent braking over longer stints and can securely mount your brake and seat.


Choose pedals for endurance training based on the braking feel you can set up consistently, then check that they can be securely mounted to your rig and seat. A high sensor rating alone doesn’t tell you how much force you’ll need to apply with your foot; also check the connection, pedal spacing and what’s included with the specific version. A multi-monitor setup affects the display: iRacing Support describes the relevant display and graphics options, while you should check pedal connectivity separately against your PC and wheelbase.
You practise consistent braking over longer stints and can securely mount your brake and seat.
You need to coordinate pedal spacing, seating position and secure support beneath your multi-monitor setup.
You want to add a pedal set and need to check whether it connects via USB or through a compatible wheelbase.
A good fit if: you need to start practising with less mechanical resistance, or can’t mount the pedals securely.
The trade-off: It primarily measures pedal movement rather than force. GermanSimRacing describes braking feel as a key difference compared with a load-cell brake.
A good fit if: you want to practise consistent braking and can provide enough support for the brake and seat.
The trade-off: Adjustable springs or elastomers can change the feel of the pedal; the sensor’s rated capacity doesn’t automatically tell you how much force you’ll need to apply with your foot.
A good fit if: you have a suitable rig and are looking for a specific mechanical braking feel or adjustable vehicle set-ups.
The trade-off: Hydraulic doesn’t automatically mean more accurate measurement; the equipment and any extra accessories you may need depend on the specific version.
| Buying criterion | What to check before buying | Who is it important to? |
|---|---|---|
| Consistent braking feel | Compare the sensor type and adjustment options, as well as the actual force required from your foot rather than just the sensor rating, where this information is available. | If I want to set up a brake for long stints and use it consistently, pedal feel matters more than an isolated figure in kg. Around 36% of consumers put consistent braking feel first. |
| Mounting and ergonomics | Check the mounting points, pedal spacing, adjustment range and whether a base plate is required. | With limited space, the pedals need to remain within easy reach without the seat or pedal set shifting when you brake. Around 29% of consumers prioritise mounting and seating position. |
| Compatibility with existing hardware | Check the connection for the exact set against your PC, wheelbase and simulator; don’t assume console compatibility without checking. | If I’m adding a pedal set to an existing wheel, its connection needs to work with my hardware. Around 21% of consumers put connection compatibility first. |
| What’s included and upgrade options | Check the version, whether a clutch and mounting hardware are included, and what extra accessories you’ll need for upgrades. | If you want to start with two pedals and upgrade later, make sure you know exactly which parts are included. Around 14% of consumers prioritise what’s in the box and the cost of future upgrades. |
For the Heusinkveld Sprint, the manufacturer lists a 120-kg brake sensor and a maximum actual braking force of 65 kg. Fanatec also distinguishes between the sensor rating and the measured force applied by your foot to the pedal plate.
Compare the specific measurements given and choose a setting that suits you and your rig.
Heusinkveld specifies that the Sprint set should be mounted to a full-frame rig. Braking forces also act on the pedals and seat.
Before choosing a model, check the recommended mounting method and whether your existing set-up can keep the brake and seat stable.
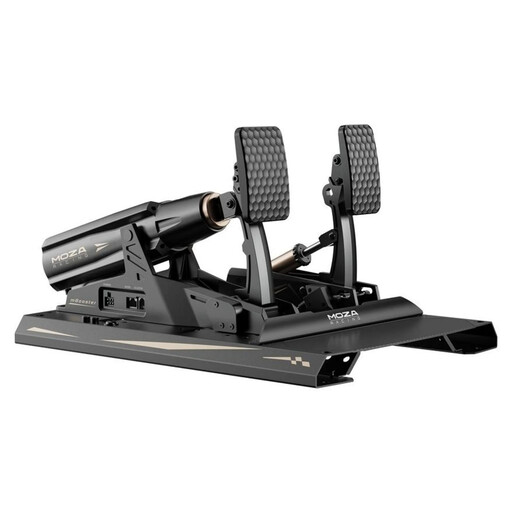
The documented MOZA SR-P version doesn’t include a clutch; for the P1000, SIMAGIC offers, among other options, a compact two-pedal version and a hydraulically equipped version.
Compare the full version name and exactly what’s included. Adding a clutch or other upgrades later may require extra parts and adjustments.
GermanSimRacing describes mechanical braking feel as a key difference; this doesn’t prove that hydraulics will make you faster.
Choose hydraulics for the pedal feel you want and a set-up that suits your rig, not because of a promised performance gain.
The CSL Elite Pedals V2 is a three-pedal set with a load-cell brake. It works with supported Fanatec wheelbases or as a standalone USB set-up on PC.
The SR-P is a two-pedal set with a direct USB connection to PC; the CRP2 is a differently equipped two-pedal version with an optional clutch.
According to the manufacturer, the Sprint two-pedal set is designed to be mounted to a full-frame rig.
The T-LCM is a three-pedal set with a load-cell brake and adjustable pedal positions.
The P1000-F is described as a compact two-pedal version; the P1000-FRS adds a hydraulic brake.
This pedal set may suit drivers looking for a three-pedal load-cell set that can be mounted to a rig, with adjustable pedal positions.
 No image available
This three-pedal set is a good option if you want to use the throttle, brake and clutch, and adjust the pedal feel for consistent braking.
Load-cell brake with a stated 200-kg sensor; this figure shouldn’t be confused with the force required from your foot.
15-bit angle sensor, with adjustable pedal angles and pedal plate height.
USB connection to PC and a set weight of 15,5 kg; make sure your rig can be mounted securely enough to support it.
No, the number of monitors doesn’t mean you need a particular type of pedal. iRacing Support describes a triple-monitor set-up as a display and graphics matter; check pedal connectivity separately against your PC, simulator and, where relevant, your wheelbase.
According to Thrustmaster, you should connect the set via USB to a compatible Windows PC to use the T-LCM calibration software, and disconnect RJ12 while doing so. You can then use the saved settings with another supported gaming platform.
No. For faulty goods, statutory consumer rights apply against the seller; a manufacturer’s guarantee is an additional voluntary benefit subject to its own terms. If there’s a fault, the first step is usually to ask for a repair or replacement.
As a general rule, you have 14 days from receiving the goods to withdraw from an online purchase, as explained by the Verbraucherzentrale. Check the terms of your specific purchase and notify the seller that you’re withdrawing from the contract, rather than simply sending the product back.
The European Union describes CE marking as the manufacturer’s declaration for products covered by relevant harmonised rules; it isn’t a quality mark awarded centrally by an EU body. In Germany, waste electrical and electronic equipment must be taken to authorised collection points or return schemes. Whether a retailer is obliged to take it back depends on the statutory conditions.